Near the end of February, I was contacted by the representative (Vijay) of a company involved in the excavation and infrastructure development industry.
The company had been contracted by the government of Dominica to repair the Layou Bridge, and they wanted to document some of the works involved. The Layou Bridge essentially connects the north of Dominica to the south, and was severely damaged during Hurricane Maria in 2017.

Layou Bridge is an important piece of infrastructure along the Edward Oliver Leblanc Highway, on Dominica’s west coast.
The Job
SOTRADOM is the local installation of a large regional contractor involved in road works, construction and raw material excavation across the Caribbean. This project was a big deal, as it involved the replacement of a section of the Layou Bridge that weighed XX tons.
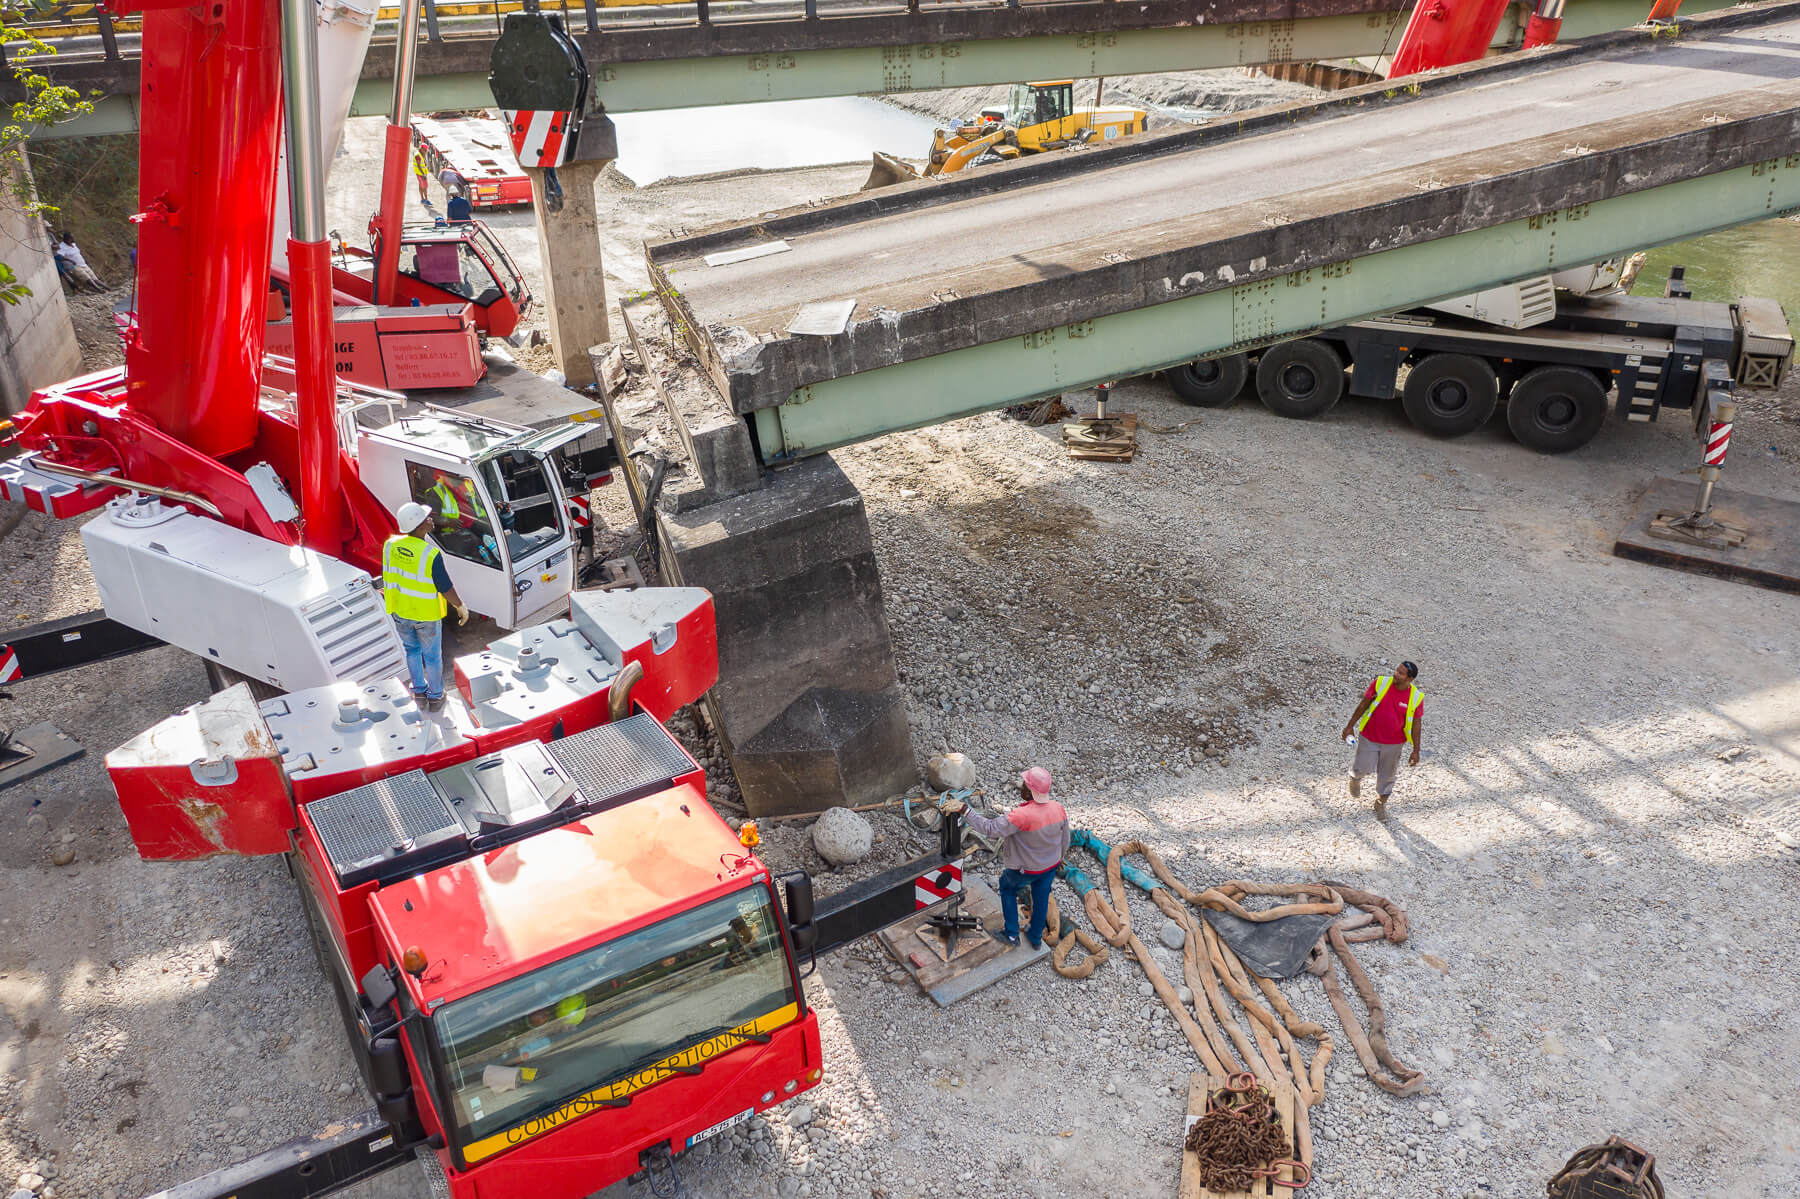
For phase one of this project, the company brought in two massive cranes on their barge. The largest of the cranes had a capacity of several dozen tons!
This is the largest crane to ever operate on Dominica, and the company officials wanted to document the process for posterity and promotion of their services.
Specifics
The job would be an day-long gig and after my initial conversation with Vijay and a tour of the work areas, I concluded that I would show the:
- incoming barge carrying the crane equipment
- off-loading of the equipment
- transportation of equipment from the jetty to the the Layou Bridge
- ongoing work at the bridge, most importantly the lifting of the damaged segment
- return of the equipment to the jetty
Vijay was in agreement with this plan, and so I began.

The tugboat, the barge and the cranes at the jetty.
Production
Shooting started at around 10:00 AM and the sun was already beating down on us.
There was no time to waste, and I captured the barge as it approached the makeshift jetty. After this was done, I took some time to shoot a few establishing shots for the video.
In film-making and video production, an establishing shot sets up, or establishes the context for a scene by showing the relationship between its important figures and objects.
For me, this meant capturing footage of the environment, including Layou River and the beach surrounding the jetty.
I also used my regular camera (a Nikon D7200) to capture a timelapse sequence of the cranes being parked after leaving the jetty. This footage would provide an alternate perspective to the aerial drone imagery.
The rest of my day followed a similar pattern:
- I would use the drone to follow the cranes’ activities and
- Use the Nikon to capture timelapse sequences
-
In between, I would charge both the drone and the Nikon’s batteries in my vehicle.
Lesson learned: For future projects it would be best to have a power bank that could handle recharging the Nikon’s batteries. Not having that option meant that I could not charge both simultaneously.
For a more fast-paced job, this could have been a nightmare, as I could miss important scenes. Thankfully, the project at hand was slow-paced and I was tasked with recording 8 hours of footage to create a 7 to 10 minute video.

One of the cranes lifting up the damaged section of the Layou Bridge. Outside of the frame, to the bottom left, is the second crane holding up the other end of the section.
Gear
Without the right gear, you either can’t do the job or you won’t be able to do the job efficiently. If it’s a paying gig, you had better get the right gear (borrow, rent or buy) so that you can meet the expectations set with your clients. There’s no way around it!
Here’s a list important gear I used during production:
Mavic 2 Pro: this is arguably the most important tool in my toolbox. Approximately 97% of the footage shown in the final video came from my drone. It is highly portable and produces high quality video and stills.
Skyreat ND Filters 4-pack | 6-pack: filters are like sunglasses for your camera. They simply block some light from coming in. This was absolutely necessary for filming, since I wanted to maintain a 1/60 second shutter speed to match my 30 frames-per-second / 4K resolution.
Nikon D7200: this is my main camera for still photography, and it’s what I used (in combination with the Tokina 11-16mm and Nikkor 18-140mm lenses) to create the timelapse sequences seen from 4:36 to 5:06 of the final video.
Lee Filters Little Stopper | Big Stopper: I used ND filters while capturing the timelapse sequences to maintain a favorable shutter speed that would produce just the right amount of motion blur.
Post-Production
Video production typically has three stages, and post-production is the last of the three (pre-production and production are the first two.)
Post-production is where the magic happens. Culling the shots, editing scenes, color-grading the clips and adding sound are all tasks that lead to a polished film.
In total, I had approximately 100 clips and 65 minutes of footage that I had to break down into a final 5 to 10 minute video. Here are the tasks in order of completion:
- Importing the clips into Adobe Premiere in chronological order
- Choosing appropriate music
- Choosing and cutting clips in time with the music
- Inserting transition effects in between clip
- Color-grading the final clips
-
Exporting the finished video file for upload to YouTube, etc.
It might look like a short process, but it took two to three days to get from step one to six!

One of the frames from a late afternoon timelapse sequence.
Delivery
I kept in contact with Vijay throughout the entire post-production process. As soon as I had a rough cut of the video, I shared it with him.
To my pleasant surprise, he was impressed, which was a good signal to continue on that path. I did so and a few days later, delivered the finished 4K version of the trailer that is seen below.
*This page contains affiliate links, which means I may earn some beer money if you make a purchase through my link. There is no extra cost to you, but it helps to keep this little blog afloat. Thank you! Here’s my official affiliate disclaimer notice.



Leave a comment